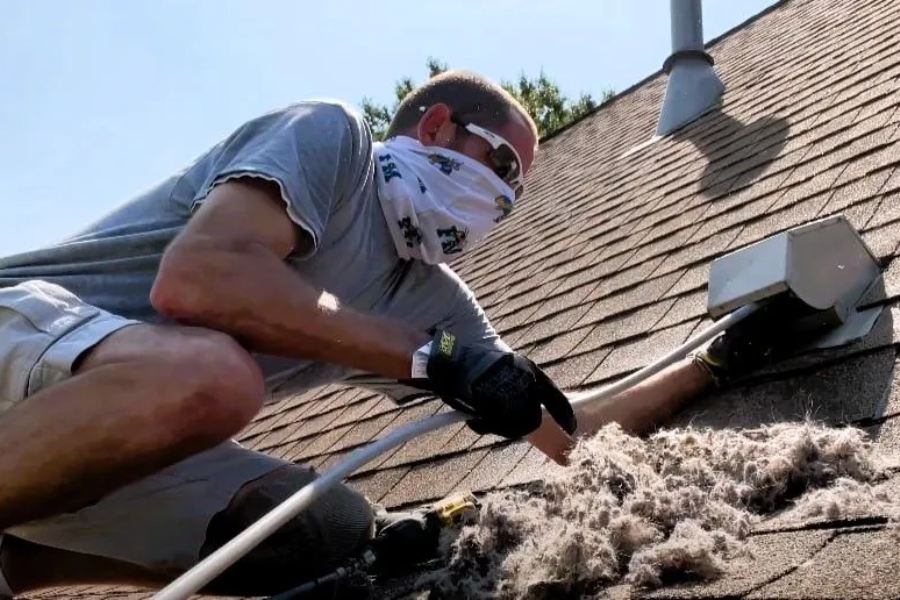
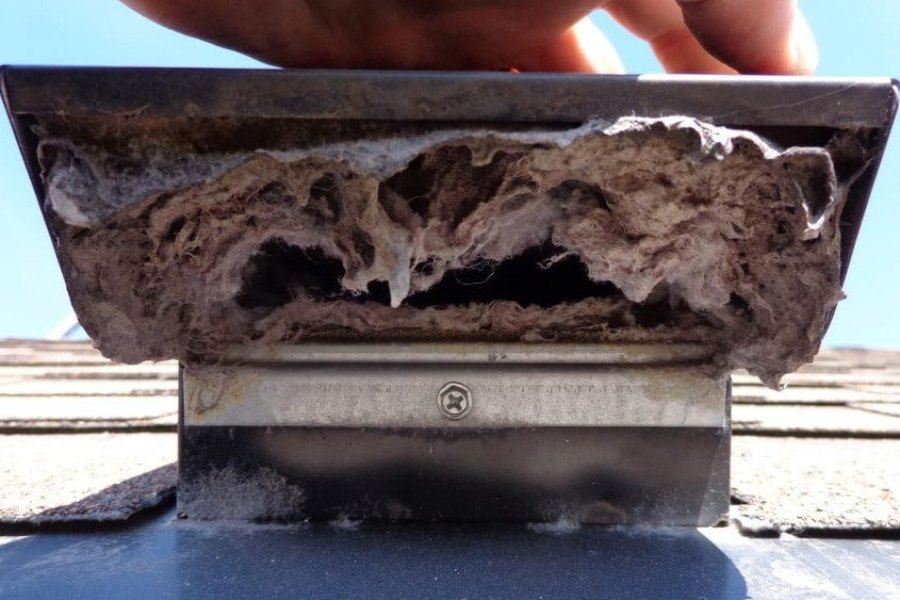
Keeping your home safe and efficient involves more than routine maintenance; it requires attention to often overlooked areas, such as your roof dryer vent. Over time, lint and debris can accumulate in the vent, leading to clogs. Knowing how to clean roof dryer vent is essential for ensuring optimal airflow and extending the lifespan of your appliance.
In this guide, we will walk you through the steps to effectively clean your roof dryer vent, helping you maintain a safe and efficient laundry system while protecting your home from potential risks. Let’s dive into the process and discover how easy it can be to keep your dryer vent in good condition!

How to Clean Roof Dryer Vent
Regular cleaning of your roof dryer vent is essential for maintaining a safe and efficient home. This simple yet vital task helps prevent lint buildup, which can lead to dangerous blockages and potential fire hazards. Regular cleaning enhances your dryer’s efficiency, reducing energy consumption and extending lifespan.
By following these straightforward steps, you can ensure that your roof dryer vent remains clear and functional. On the other hand, neglecting this important maintenance can result in longer drying times, higher energy bills, and unnecessary wear on your dryer. Now, here are the necessary steps to clean your dryer vent:
1. Turn off the dryer and locate the vent
Before beginning the cleaning process, it’s essential to turn off the dryer completely. This precaution ensures your safety while working on the vent system and prevents any accidental starts.
Next, locate the vent on your roof. Familiarizing yourself with its position will make the cleaning process smoother and more efficient. If you’re unsure about its location, consult your home’s blueprints.
Take note of the vent’s surroundings, including any potential obstacles or hazards. This will help you plan your approach and ensure you have all the necessary tools and safety equipment.
2. Remove the vent cover
To access the duct and vent opening, start by removing the vent cover. This process typically involves unscrewing the cover with a screwdriver or another suitable tool. Exercise caution during this step to avoid damaging the cover or the surrounding roofing materials.
If you’re working on a sloped roof, take extra care while removing the cover. Ensure you have a secure footing, and consider using safety equipment, such as a harness, to prevent any potential falls.
Once the cover is removed, inspect it for any signs of damage or wear. If you notice it’s in poor condition, we advise you to maintain proper ventilation and prevent pests or moisture from entering the vent.
3. Use a dryer vent-cleaning brush
The primary tool for cleaning a dryer vent is a long, flexible dryer vent cleaning brush. To begin, insert the brush into the vent, pushing it as far into the duct as possible. As you do this, rotate the brush to dislodge any lint and debris that may have accumulated.
Then, work the brush back and forth, continuing to rotate it to ensure a thorough cleaning. You may need to repeat this process several times to effectively remove all the lint and debris.
While cleaning, pay close attention to any resistance you encounter. This could indicate a significant blockage or potential damage to the vent system, which may necessitate professional assistance.
4. Clear out remaining debris with a vacuum or blower
After brushing, use a vacuum equipped with a long hose attachment or a leaf blower to eliminate any remaining lint and debris from the vent. This crucial step helps restore airflow and ensures the vent is as clean as possible.
If you opt for a blower, direct the airflow into the vent from the roof. Begin at the outer edge and work inward to prevent compacting debris deeper into the vent.
Conversely, if you choose to use a vacuum, you may need to work from the roof and inside your home for optimal results. This dual approach effectively removes debris along the entire vent length, maximizing cleanliness and restoring airflow.
5. Replace the vent cover and check for airflow
Once cleaning is complete, securely replace the vent cover. Ensure it’s properly sealed to prevent water, pests, or debris from entering the vent. Check that all screws are tight and the cover sits flush against the roof.
Finally, turn on your dryer and check for improved airflow. You should notice stronger, warmer air from the vent, indicating that your cleaning efforts have succeeded.
Monitor your dryer’s performance over the next few loads. If you notice any issues or if airflow doesn’t seem improved, you may need to clean again or consult a professional for a more thorough inspection.
Types of Roof Dryer Vents
Roof dryer vents are available in several varieties, each with distinct characteristics that influence their cleaning process. The most common types include hood vents, louvered vents, and box vents.
Hood vents have a sloped cover that opens when air flows out, allowing for effective ventilation. In contrast, louvered vents feature angled slats that help direct airflow while preventing debris from entering.
Lastly, box vents, typically larger and more square in shape, offer a different design that may require a specific cleaning approach. Now, we discussed how to easily clean them in the following:
Cleaning hood vents
Hood vents require careful handling of the flap mechanism during cleaning. When removing the cover, it is essential to avoid damaging the hinge or spring, enabling the flap to open and close smoothly.
To protect this mechanism, use a brush with softer bristles when cleaning around the flap area. Additionally, pay special attention to the edges, where lint can accumulate, as this buildup may prevent the flap from closing properly.
Cleaning louvered vents
Louvered vents often collect more lint between their slats, requiring a more thorough cleaning approach. So, use a small brush or compressed air to clean between each slat, ensuring no debris is left behind.
However, be gentle when cleaning to avoid bending or damaging the slats, as this could impair the vent’s function. After cleaning, check that all slats move freely and are not obstructed.
Cleaning box vents
Box vents typically have a larger opening, which can make them easier to clean but also more prone to pest intrusion. When cleaning, inspect the edges and corners where debris often accumulates.
Use a longer brush to reach further into the duct, as box vents are often connected to longer vent pipes. After cleaning, ensure the cover fits securely to prevent animals from entering.
How Often Should You Clean Dryer Vent on Roof?
The frequency of cleaning your roof dryer vent can vary based on several factors, such as dryer usage, the types of fabrics being dried, and the vent duct length. While we recommend annual cleanings, some households, particularly those with high dryer usage or those that frequently dry heavy fabrics, may require more frequent maintenance.
To determine whether more frequent cleaning is necessary, watch for key signs: longer drying times, clothes feeling unusually hot after a cycle, or reduced hot air output from the external vent. Also, the length and configuration of the vent duct, along with local environmental factors like humidity and airborne debris, can significantly influence the ideal cleaning frequency.
As experts, we must emphasize that regular inspections are essential in identifying the best cleaning schedule for your circumstances. Maintaining a clean dryer vent is crucial for energy efficiency and fire prevention.

Conclusion
Learning how to clean roof dryer vent is vital for maintaining a safe and efficient home. Regular maintenance prevents lint buildup, which can lead to dangerous blockages and fire hazards, enhances your dryer’s efficiency, reduces energy consumption, and extends the appliance’s lifespan.
Now, you can confidently tackle this important maintenance task by following the outlined steps. Neglecting this essential upkeep may result in longer drying times, increased energy bills, and serious fire risks.
As you prioritize the cleanliness of our roof dryer vent, it’s also worth considering professional help from experts like Tallahassee Roofing. We ensure optimal performance and protection for your home!
